
A few weeks back I did a post talking about how to update your Mac using the Terminal, and in it I mentioned that this only was for patches to your existing version of Mac OS, not for upgrading to a newer version like going from Monterey to Ventura. What I didn’t say in that article, was there was a way to do it. In fact, you can not only upgrade your Mac with the Terminal, but you can download previous Mac OS installers to your machine to use (which is really useful for making installers).
Before You Begin
There are some caveats to this approach. First, you can only download previous Mac OS versions as far back as the Mac you’re doing this on. If I’m doing this on an M1 Mac Mini, that originally came with Mac OS 11, “Big Sur”, it can’t get versions of Mac OS older than that via this method. If you want to get older versions, you’ll have to get them from the Mac App Store or via Apple directly (which you can find with this link).
The other thing to note, though it is also a benefit, is when running this method you may actually see multiple versions of the same OS in the listing. That said, these won’t be every revision of that particular OS. So on that M1 Mini, I can see Big Sur 11.5.2 all the way back to 11.6.8, but I can’t see anything older than 11.5.2. This will make more sense once we go through it, but you’ll want to make sure you know what version you need to get and how it will work with the hardware you’re going to be using it on. If you’re not sure or want the widest availability, then always get the most recent version has to offer.
Lastly, if you are in an enterprise environment that prevents end-user machines from upgrading their own operating systems, then this command may not work.
With all that said, let’s open up the Terminal app.
Seeing Your Options
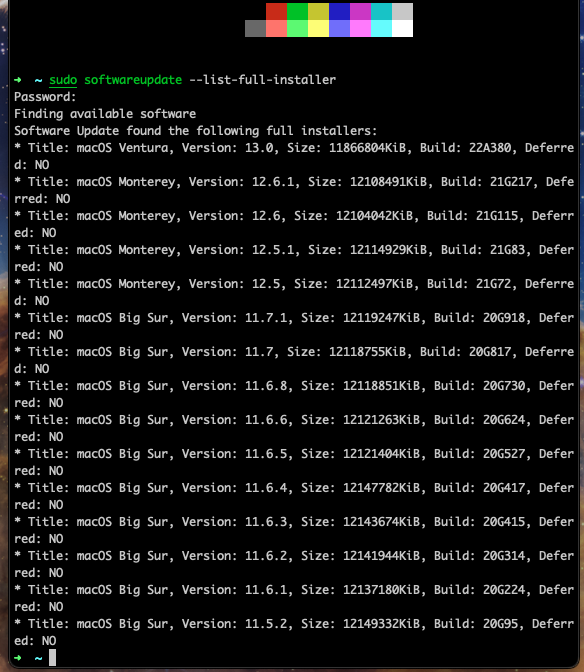
In the Terminal, type in the following code:
sudo softwareupdate --list-full-installersYour machine will pause for a moment and then present you with a list of available installers with the latest version at the top and each succeeding item in the list being an older version of Mac OS either in the same version or an earlier revision. You’ll see the title with the fun name of the OS, the version with it’s specific version number, the size of the installer, the Build number, and whether it was deferred. If you’re running this prior to Monterey, you may not see Build Number, just be aware of that.
As previously mentioned, you may notice for Monterey and Big Sur (version 12 and 11 respectively) they don’t go all the way back to their earliest stable versions, but seem to stop at a certain point. It’s not clear on the face of it why Apple stops after a certain point. The only consistent thing I’ve found all are typically after a unified build number and there are no split build numbers for the same revision of Mac OS. Even then there are still gaps. In the Big Sur example on the right, you’ll note that 11.6.7 and 11.6 are strangely absent from the listing. I’m not personally sure of why this would be the case, but it seems most versions are available beyond a certain point, but they may get dropped eventually.
Downloading Your Installer
Once you know what you want to install, it’s time to install it. Fortunately, you just need to know the version number you want. The code looks like
sudo softwareupdate --fetch-full-installer --full-installer-version VERSION.NUMBER.HERESo if you knew you wanted the installer for Monterey version 12.6, your code would look like this:
sudo softwareupdate --fetch-full-installer --full-installer-version 12.6.1The Terminal will then say that it’s “Scanning for Installer”. After a few minutes, it should then say that it’s “Installing” and show a percentage indicator. Don’t panic. It is not actually installing that version of Mac OS on top of or over your current version. Instead it’s downloading the installer and putting it into the Applications folder on your drive. Depending on the speed of your Internet and machine, it can take anywhere from a few minutes to a couple of hours to download the complete installer package from Apple.
When it finishes, the Terminal will say “Install Finished Successfully”, and you’ll find your upgrade installer file there. Just like if you downloaded it from the App Store, you can double click it to start the install process.
If you would rather have it launch the installer immediately after downloading then you’ll need to add an additional parameter to the command, the –launch-installer. So your command will look something like,
sudo softwareupdate --fetch-full-installer --full-installer-version VERSION.NUMBER.HERE --launch-installerIn my example case, it will look like this,
sudo softwareupdate --fetch-full-installer --full-installer-version 12.6.1 --launch-installerThat’s pretty much all there is to it. A pretty straightforward and convenient process.

[…] One thing I’ve run into is occasionally the updates won’t be seen by the OS, in which case you can actually get the updates another way by going through the Upgrade method in the Terminal. You won’t have to upgrade to a new version, say from Monterey to Ventura, but you can use it to get just the latest updates for the version of Mac OS you’re currently running. I’ve got a guide on how to do just that. […]
[…] You also won’t be able to download previous versions of Mac OS via the Terminal, which I wrote a guide to over here. […]
[…] just fails to run. El Capitan is no longer available in the App Store, and you can’t run the Terminal command to get older versions of Mac OS to get El Capitan […]